Be yourself; Everyone else is already taken.
— Oscar Wilde.
This is the first post on my new blog. I’m just getting this new blog going, so stay tuned for more. Subscribe below to get notified when I post new updates.
Be yourself; Everyone else is already taken.
— Oscar Wilde.
This is the first post on my new blog. I’m just getting this new blog going, so stay tuned for more. Subscribe below to get notified when I post new updates.
It started with an idea.
It ended with a masterpiece.
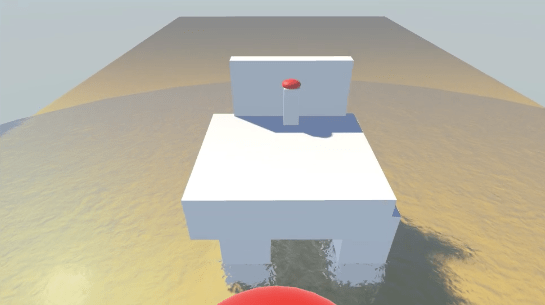
Behold, the Unity-made version of Wipeout, specifically made by a struggle bus. Now, I know what you’re thinking, ‘Dude, this shit looks like a whole lotta garbage, it’s so simple’. Yeah? Well how about you try jumping on those circular balls and making it across to the finish. Just in the video alone it took like 4 tries and before that we had only made it once after like 60 attempts.
So what is this shit you may ask? Well, it’s Unity being used by somebody who doesn’t know how to. I had a ton of different ideas for what I wanted to build in this program. A town. A big ass ramp to meet cars off of. Maybe a lil backyard with a pool. Well, none of these ideas came into fruition because for one, I couldn’t find a house that actually looked like a house in the Standard Assets, instead just a fates black box that I was supposed to apply a texture to. Nah, I’m good fam. The ramp idea? Well that shit is just a ramp, nothing to exciting. The classic backyard? Well everyones probably doing that shit, I wanted to make something of my own!
I was sitting back going through some reruns during this corona shit and happened to come across an old episode of wipeout and bam, inspiration struck. I decided I would build one part of the original obstacle course, the big red trampoline balls that you had to jump on and across to make it to the finish. I did this by adding in multiple cubes that were elongated into pillars to hold up the balls. Next, I added the big red balls to the top of these pillars and made them one body since near the beginning (and I can’t explain it) the balls would literally fall off and roll away when I hit play. I then added water (that moves AND is transparent) below the pillars to show where you’d end up if you missed your jump. I also added a semi-transparent ramp to the beginning of the course so you could actually jump onto the balls and finally added the last little standing floor with a red button on top to hit when you reach the finish.
To make sure I fulfilled the outside player requirement, I went to my local Discord with some friends and had one of them play the game. As you can see from the video and dialogue, he seemed to enjoy the little game I created and was actually a little spooked he didn’t make it his first time. Overall, the process was extremely annoying as many of my objects seemed to either fall over, move in ways I didn’t want to, or wouldn’t attach properly to other objects. Though simple, the game itself proved to be a hit among my friends and they appreciated how despite terrible visuals, you could still have fun. Below are some pictures of the area I made, not much of the process but it’s not hard to figure out what I did. Hope you enjoy and if you’re looking for Wipeout: Struggle Bus Edition on the Steam Store, just know early access rates start at $39.99. Available this summer.
EDIT: After posting the video (I didn’t actually watch it first), I realized one of my friends in the Discord watching the game being played happened to have a bit of a potty mouth so I threw a squeeze toy effect over that lil part for ya. You’re welcome.


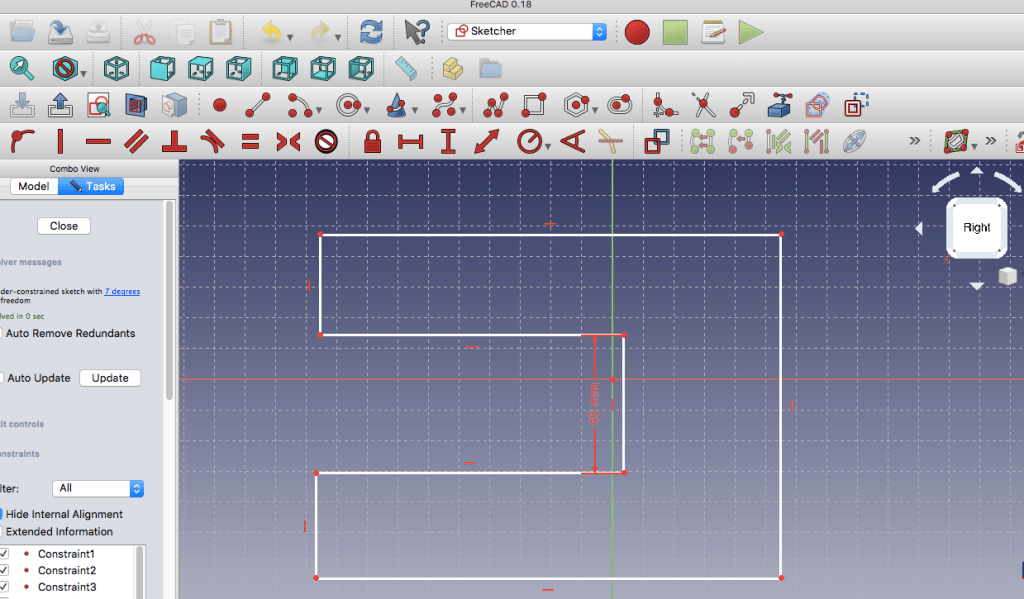
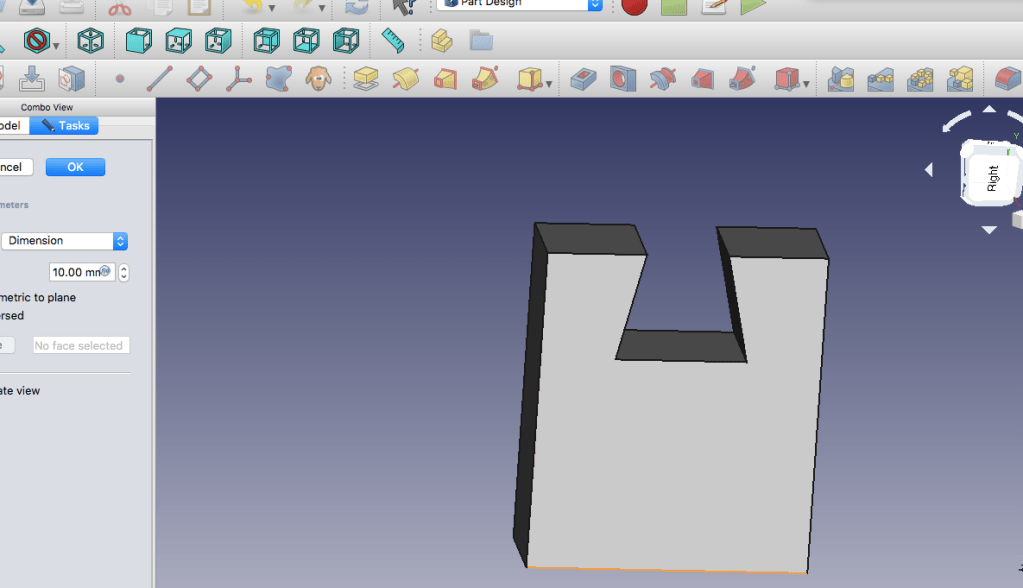
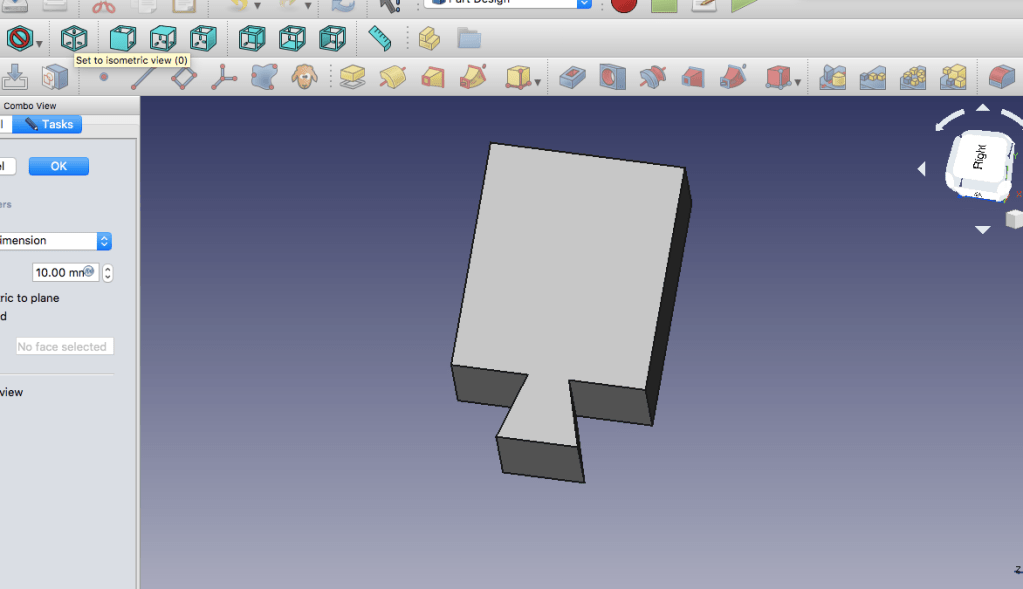
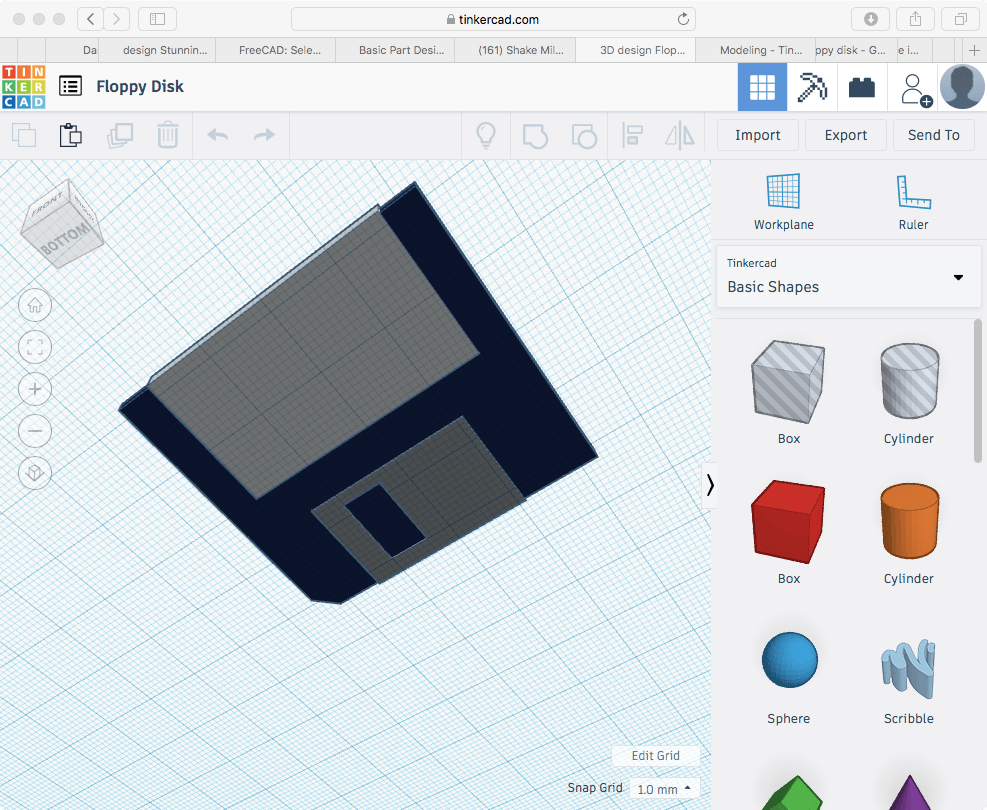
So the issue that I happened to come across in my house was a kitchen chair with uneven legs, making it so when you sat in it, you would inevitably keep rocking back and forth. As a solution, I decided to develop what I’ll call, the Chair Stepper. Shaped like a set of stairs, the Chair Stepper has an opening to insert the shortened leg into to help balance the chair out. It is shaped like a set of stairs because it has 3 different ‘settings’ if you will, in that if there is a more significant differentiation between one length of a chair leg to the others, you can accommodate accordingly. I’ve included a picture of the chair I plan to modify with the Chair Stepper, which has rounded legs with a 1.9 centimeter diameter at the bottom point and a 2 centimeter gap between the bottom of the leg and the stopper which is 3 cm. in diameter above it. Thus my design includes a 15 x 5 cm block with varying heights, with each of the three 5×5 cm sections having a 2 cm hole in the middle to allow for the bottom of the chair leg to fit perfectly. At the highest setting (meaning the leg is very different in length to the others) it has a height of 6 cm. with a hole that goes in about 2 cm deep. The next is 4cm tall with a 2 cm deep hole and the lowest is 2 cm tall with a 1 cm deep hole.
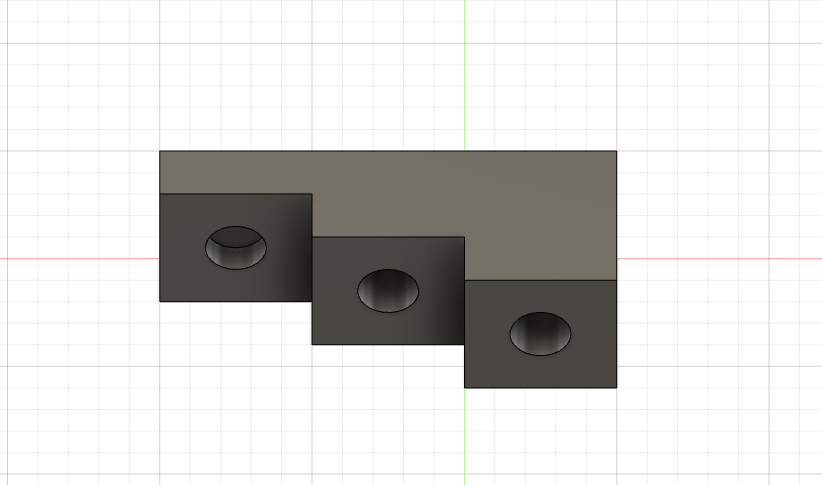


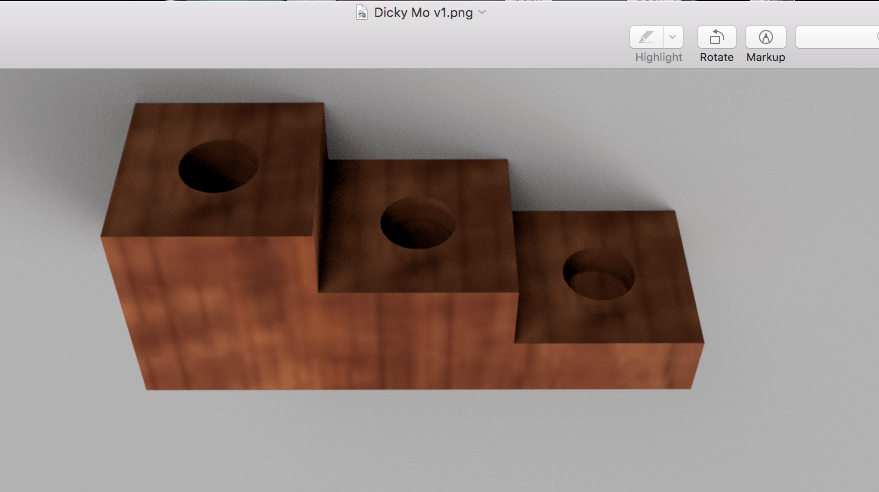
This is where I’ll include the rendered object (Chair Stepper) in Fusion360 as well as what it would look like in the real world. Please ignore that absolutely terrible crop in the real-world image, on Mac apparently the only smooth movements that can be made are from side to side and up and down. As you can see from the picture, the bottom of the leg would be inserted into whichever hole necessary to make the chair balance. Also, keeping the Chair Stepper elongated ensures it doesn’t slip around or tilt over, instead remaining flat, especially when someone sits in the chair.

That’s gonna do it for me Lucas. Remember, the most creative designs come from the simplest ideas and you are now in the presence of one of them. Enjoy.
This is my chair. There are many like it, but this one is mine. I love my chair but unfortunately, it’s a bit uneven (probably from leaning back and forth on it too much) and thus needs some help from the ole 3D printer. It rocks back and forth when you sit on it, and can be quite annoying when trying to eat food while sitting in it. I believe a 3D printed object underneath one of the uneven legs of the chair can help solve this issue. This the video of my chair (and part of my kitchen). Please don’t judge me. Thanks
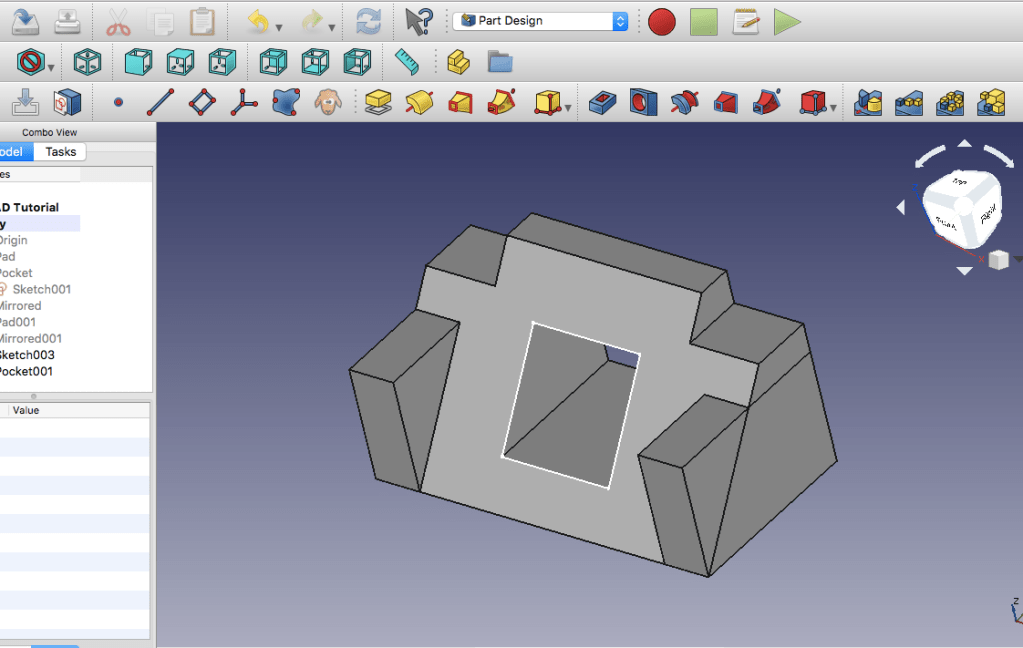
For a 12 minute tutorial on youtube, you would think even a Struggle Bus could just follow along to some random dude named ‘Ha Gei’ doing the steps pretty much for you. I can assure you, that was very much not the case. Upon opening (and thinking I needed to reinstall FreeCAD 3 times) FreeCAD, I was met with a completely blank space – No toolbar, no combo view, no buttons, nothing. This lead to the 3 uninstall and reinstalls. It only took me an hour to realize that they were just hidden and I had to go into the options to reveal them. THEN, I had to restart my tutorial like 6 times because I would accidentally hit a wrong button or the ‘Escape’ key too many times and would be sent into an irreversible view that I couldn’t work from. (Cue the 6 restarts). So, already, I was off to a very fun start.


After the 2 hour tutorial struggle, I was met with the whole desk cord holder thingy majiggy. Having learned nothing from the tutorial since I pretty much just copied the mouse clicks that Mr. Gei was doing, I struggled for about an hour just to even make the body become 3D until I realized there was a SECRET Van Hollen video that showed him doing the steps for you again. Yay! Cue an extra hour of me struggling through that but nonetheless, got it done and made it fit my Mac Laptop charger cord specs (3mm diameter) as well as the shape of my desk (45mm height). I even rounded that hoe to make it look pretty like Lucas asked <3.
And last but not least, BEHOLD! The fucking shittiest puzzle piece you’ve ever seen in your life. That’s right, I sat here for an extra 2 hours thinking of how the fuck you make 2 parts that can interlock and won’t come apart if held upside down. I mean literally, I felt like I had been tasked to develop a corona vaccine in a single day (since I procrastinated). I even pulled out a paper and pen thinking, “maybe if I draw it, it’ll be much easier to just translate into the program”! No, wrong. I couldn’t even wrap my head around even the possibility of two items that would interlock without something else holding them together like a clip or glue or some shit. Right around sunset, racking my total time spent on this assignment up to about 7 hours, I had the answer. A paperclip! I mean, there’s no way if they interlocked, they would ever fall out. It was the perfect idea, until I had to actually make that bitch in FreeCAD. You’d think a little wire bent a couple times wouldn’t be too bad to make right? Wrong again. I soon realized if that shit wasn’t rounded, you wouldn’t be able to interlock that shit. Cue me rounding EVERY. SINGLE. CORNER. It’s rounded so it’s chillin? Nah fam, the whole length of the wire has to be the exact same width. Cue me fixing the lengths and widths so that bitch looks like a real paperclip (I wanted that A). Well that only took me up until about 30 minutes ago. Then I realize that I have to make that shit AGAIN for Object B. I was thinking I might just take a photo of the same fucking paperclip from 2 different angles and saying they were 2 different objects but I was like nah, fuck that shit, if I spent all this time on it already, Ima do it right. Well, apparently FreeCAD heard me through the mic in my computer and about 10 minutes into making shit paperclip #2, the whole fucking program crashed. I even got trolled into thinking I could recover the stupid thing with a ‘Recover’ button but upon pressing it, none of my work came back. Love that! So instead of my genius paperclip idea, I went on google (the only piece of tech that has never failed to let me down) and searched up interlocked parts, found a puzzle and was like fuck this shit Ima make a thick puzzle piece. So there ya go, my process for object 3. As long as you hold it vertically, the puzzle piece will never fall out. Horizontal, not so much but hey, the only criteria was for it to not fall apart if TURNED upside down, not flipped. Thank you and good riddance FreeCAD.
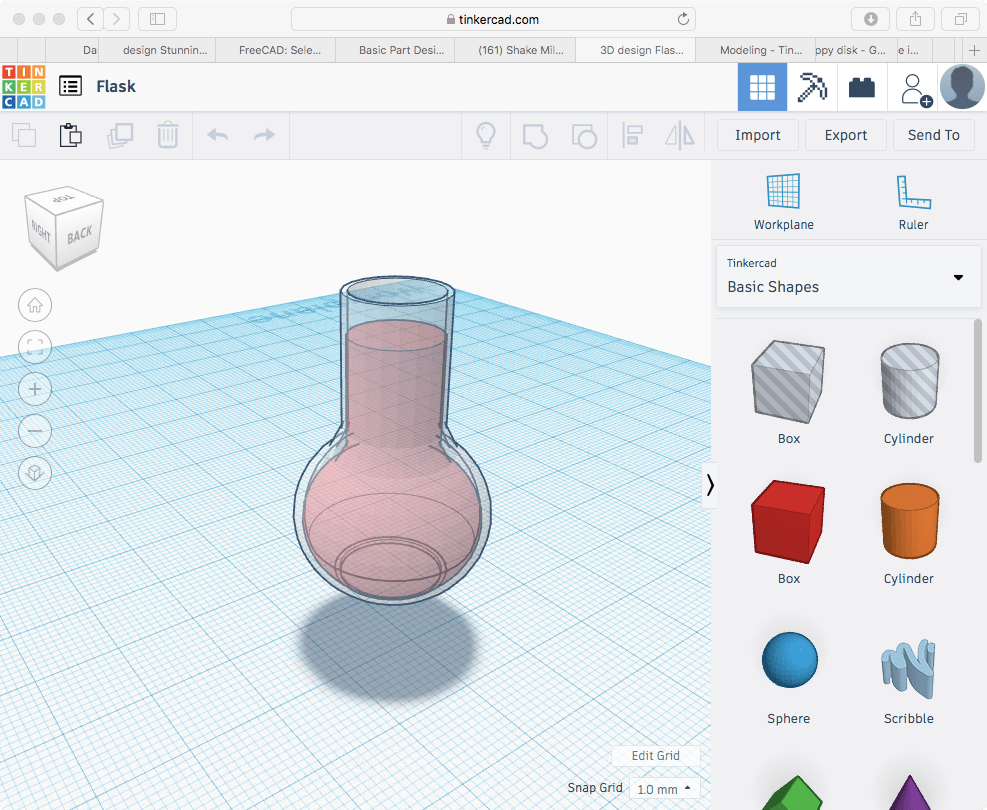
Where to start with this program… I guess I could say I found it pretty easy at first. Making the PVC pipe and the egg was an absolute breeze, each object only taking up a handful of shapes. Then we started progressed into some more difficult tasks, like making a bowler hat with a curved brim or the spoon with the little curve in the neck. Rounding out the shapes were next to impossible for a program that’s supposed to be used by little kids but my world really didn’t end until I got to the glasses. Despite multiple attempts, I had no idea how to shape out the lens and fit it into the frame, in fact, the frame was never actualized, instead I just got stuck rounding out the corners of the lens to no avail as there would constantly either be little jagged edges sticking out or the improper grouping of objects that would make everything come out weird. My idea was to use a wide rounded roof that was stretched out to naturally create the curve in the frame and then put more stretched out, rounded roofs along the side to build the frame but again, I wan’t able to completely carve all the sharp edges so my picture is simply gonna be what the lens WOULD’VE looked like had it been finished. Overall, I’d say the difficult presented in this program was expected as we knew it provided somewhat of a tutorial for basic 3D modeling, however had serious limitations when it came to designing objects with rounded or contorted edges. For a struggle bus though, I don’t think I did too bad even though TinkerCAD is supposed to be for little kids but you know… whatever.


The formation of group B was an unusual one – Five different people ranging in five different levels of proficiency with technology forced to come together to make an app. However, once greetings were exchanged and everyone their role, it was clear we had the chemistry of a team like the Power Rangers or the 12′-13′ Miami Heat.
Day one of coming together we determined we wanted to create a sort of interactive adventure game as our app. We discussed the different scenarios the player would be forced into based on the decisions they made. By day two, we’ve each gone home and brought back different forms of media we’ll be using for the app, such as pictures and sounds. We also began putting together some of the blocks of for the home screen. Day three, we made major progress by testing and finishing over half of the code required for the app as well as most of the voice narrations that will be played over each screen. We were also able to input the correct media for each corresponding screen.
Now I say ‘we’ a lot but in reality, I don’t contribute much to the coding aspect of this app. However, I found my niche in providing voice-overs for some of the narrators as well as having searched and converted all of the audio files that we’ll be using for the app. Knowing that most of my team members didn’t even have class today, I decided to help generate a positive attitude about the situation by bringing in a dozen donuts from Dunkin’. Through my compensation efforts, I believe my team has truly begun to appreciate my efforts, even if I’m a Struggle Bus.

I’m not a fan of coding. The MIT App Inventor, apparently made for kids in grade school, is one of the most confusing and sophisticated programs I’ve ever come across. Having already folded on the first blog post, I knew it was time to come up clutch on this second one and I have to admit, I cheesed the system. The instructions for this blog post was to have at least 200 words concerning my experience with the app-creating and one screenshot. Thus, I took advantage.
Though we worked with code and messing with buttons and sounds, I completely forgot all about it and wasn’t able to use my 15 years worth of education to make my button play a sound when it was clicked on. I know, the simplest thing and I wasn’t able to do it. However, the requirement only asked for a screenshot so in return, I’ve attached of my app with two images that does absolutely nothing. Not even the button could be clicked, at least on my laptop. I tried everything, between switching audio file formats, actual files as well as used a plethora of different coding blocks and came up with nothing. However, from the screenshot, you’d think the button would make some sort of licking sound. Instead, it does nothing, but you won’t know that until you read this tomorrow. Gotcha. Thus, my stress for the day has come to an end. Goodnight.


I walked into class the same way I walk into any class – Tired, lazy and more importantly, uninterested. You see, I’m not a computer guy though I do dabble in the e-sports category. Aside from that, I’m pretty much useless so you can imagine how I felt enrolling in a class structured around Emerging Technologies. Despite my typical inattentiveness, Professor van Hollen managed to work his magic and really catch my eyes and ears.
It’s important to understand these things about myself as they tie into my overall character. I’m a 19-year old majoring in Finance and for some reason I’m taking a class on computers, which goes to show I pretty much have no clue what I’m doing. But that’s just how I’ve lived life so far, like a fat dude floating down a lazy river. I may not know where I’m going, or why I’m even moving in the first place, but the instructions clearly said to float down this river so that’s what I’m gonna do.
That being said, peace out. Let’s see where this tube takes us.

This is an example post, originally published as part of Blogging University. Enroll in one of our ten programs, and start your blog right.
You’re going to publish a post today. Don’t worry about how your blog looks. Don’t worry if you haven’t given it a name yet, or you’re feeling overwhelmed. Just click the “New Post” button, and tell us why you’re here.
Why do this?
The post can be short or long, a personal intro to your life or a bloggy mission statement, a manifesto for the future or a simple outline of your the types of things you hope to publish.
To help you get started, here are a few questions:
You’re not locked into any of this; one of the wonderful things about blogs is how they constantly evolve as we learn, grow, and interact with one another — but it’s good to know where and why you started, and articulating your goals may just give you a few other post ideas.
Can’t think how to get started? Just write the first thing that pops into your head. Anne Lamott, author of a book on writing we love, says that you need to give yourself permission to write a “crappy first draft”. Anne makes a great point — just start writing, and worry about editing it later.
When you’re ready to publish, give your post three to five tags that describe your blog’s focus — writing, photography, fiction, parenting, food, cars, movies, sports, whatever. These tags will help others who care about your topics find you in the Reader. Make sure one of the tags is “zerotohero,” so other new bloggers can find you, too.
